

Happy Monday! Another weekend gone by, but well spent. On Friday night we went for a walk and a movie date with friends, then had a relaxing day at home Saturday and then yesterday morning my hubby and I did yard work. So to treat ourselves we decided to spent Sunday afternoon strolling along the lake after a coffee date followed by an amazing dinner of all-you-can-eat-sushi!!! After a long days work, it’s pretty disgusting astounding how much sushi a full grown man and a pregnant lady can really eat. haha we won’t go there….
It’s mini dates with my man that I am truly cherishing right now. We know that in five short weeks we will be welcoming a new addition to our family so we are taking full advantage of all the one on one time together that we can get. We know that with a new baby our time as a family will change, but we also know the importance of taking the time to reconnect with each other to keep our relationship strong. But in the meantime I’m loving having him all to myself.
Time for the crafting! I thought this would be a great diy to post as the perfect solution to getting through these last few hot weeks of summer! I made several of these headbands. Some for the beach, working out, washing my face, or when I want a cute spin on a regular ponytail day. All you need is an old T-shirt (or any fabric that has a little bit of stretch) and a sewing machine or hot glue gun! It’s soooo easy:
Cut two horizontal strips from the bottom of your t-shirt. (cutting through both layers about an inch and a half wide)
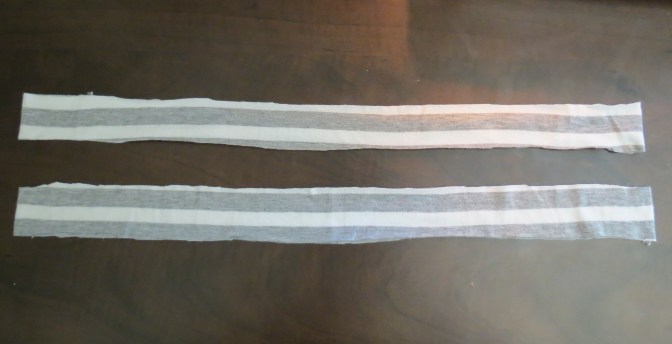 Pull gently until the pieces are stretched out.
 Lie the first piece down on a surface like this.
 Lie the second piece on top like this.
 Tuck both ends of the top piece under the first piece like this.
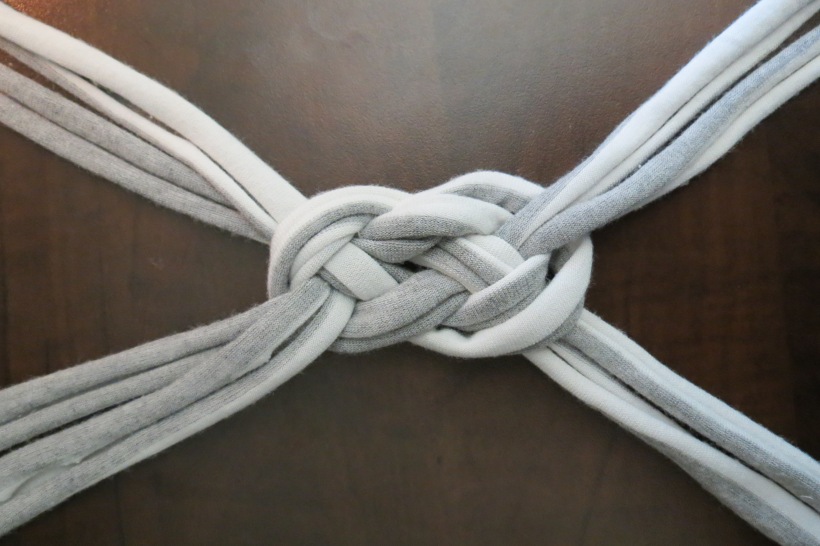
 The end of the top piece will go under the opposite end through the loop.
 Pull all four ends of the material so the knot tightens up.
 The ends of your material will probably be uneven like this.
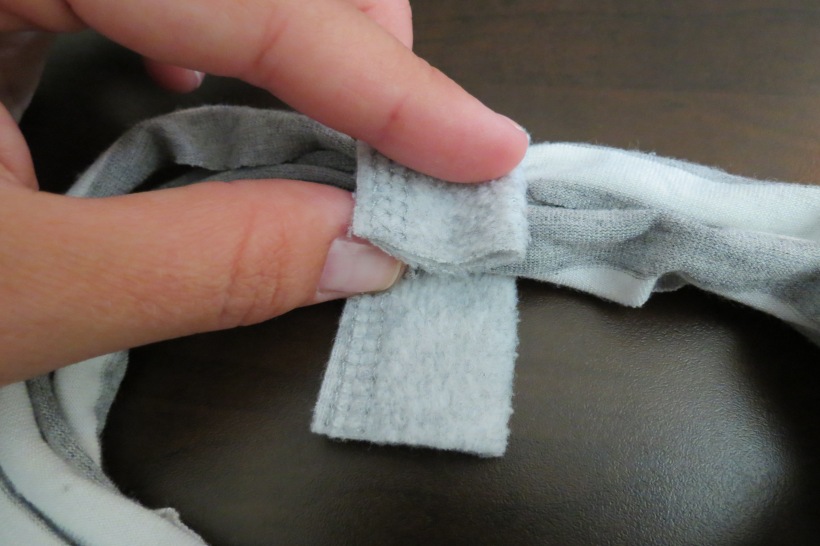
 Cut the ends even and lie on a small rectangular piece of fabric. I used a piece of flannel material that I had.
 Sew back and forth across the ends to attach it to the rectangular piece of fabric. If you don’t have a sewing machine, a hot glue gun will also do the trick!
 Wrap the rectangular piece of fabric around the ends and secure by sewing back and forth with a sewing machine or use your hot glue gun! Ta-da! You’re done!

A wise man once said, ‘a smooth sea never made a skilled sailor. ~Author Unknown


Pingback: 8 Delightful Ribbon Tutorials - Drency Ribbons & Crafts Community
Pingback: Plans for an arts and crafts-y December (AKA last minute Xmas gift ideas…) – Self Assembly Required!
Pingback: Pour patienter | Clémentine & Chocolat
Pingback: 不要なTシャツとボトムスのリメイク有効活用法
June 17, 2016 at 2:25 am
wow great, i want make it soon. may i share your blog? thanks
June 20, 2016 at 9:28 pm
Absolutely! I’m glad you enjoyed the tutorial!
March 15, 2016 at 11:49 am
If you don’t have a sewing machine can you hand sew this project?
March 18, 2016 at 1:41 pm
Absolutely!! You will only need to do a few stitches to join all the loose ends together in the back! A hot glue might even work depending on the material!
February 2, 2016 at 10:43 am
So Cute! I’m not a sewing person but bought a few shirts and ta da 15 team color headbands ready for our tournament. Thanks! Cost affective too!
February 10, 2016 at 12:16 pm
I am so glad that this headband tutorial worked out for you. Once you’ve made one it gets easier and faster everytime!! Anytime!
September 17, 2015 at 9:04 am
Well, tried this and #1 it’s too small for me, #2 Hot gluing it DOES NOT work! I was soo disappointed :( Pinterest fail lol!
September 20, 2015 at 7:48 am
Oh no!! Yeah it really depends on the how tight you want it and the fabric as to whether hot glue will work. I hope you try again! I have had many Pinterest fails myself. Happens to the best of us!
Pingback: 4 Ways to Recycle Old Tshirts | itsonlyaly
June 7, 2015 at 3:46 pm
I am so happy I found this. I have lupus and after a recent flare began losing my hair. I’ve been looking for headbands I can put together easily to hide my thinning and protect my scalp from sunburns. This came together in no time! Plus the purpose is two-fold as it not only hides my bald spots but since I used my military hubby’s old t-shirts, makes it so I can have a little something of him close even when he’s gone.
June 8, 2015 at 12:36 pm
I absolutely love your story about keeping your husband close to you with this DIY. It is stories like yours that inspire me to keep creating simply because making someone’s life a little easier is all it takes to make me happy! I’d love to see your version of this headband!
May 28, 2015 at 3:40 pm
Thanks for the tutorial! Tried it and it came out perfect! I don’t have a girl but some of my friends do, and a few girl baby showers are coming up :) thanks again!
May 28, 2015 at 3:45 pm
I’m so glad it turned out! It is super easy and quick after you have made a few!
May 20, 2015 at 12:22 pm
Love it!! I took an old but still lookin new white pair of knit pants and made 2! Looks great!!!! Gonna share with my church lady friends!
May 22, 2015 at 9:15 pm
Oh I’m so glad that you found this tutorial useful! It is such a simple and quick DIY so share away!
Pingback: 40+ Homemade Gift Ideas For Fall | Rock It Like A Mom
January 20, 2015 at 3:38 pm
Keep working ,impressive job!
August 23, 2014 at 8:29 am
I realllllyyyy hope you see this!!!! What if i want to make one for a one year old?! Do i do anything differently??
August 26, 2014 at 11:25 am
Hey! If you are making this headband for a lil one I would simply suggest cutting the length of the bands on either side to make a smaller headband diameter. The knot and all other steps would remain the same. Let me know how it turns out :)
Pingback: DIY Hair Accessories & 2014 Spring Hair Color Trends
April 14, 2014 at 8:03 pm
I love this…I just made one for me and one for my daughter…too cute!
April 15, 2014 at 6:18 pm
Oh I’m sure it looks great on both of you!!!
March 27, 2014 at 7:40 am
love going to try this afternoon :)
March 27, 2014 at 2:09 pm
Great! Let me know how it turns out!
Pingback: A little sick day crafting. | createdfamily
Pingback: DIY Sailor Knot Headband | Home and Heart DIY
September 23, 2013 at 6:18 pm
This is cute and easy! I just tied the ends together with some leftover fabric because I plan on wearing my hair down. Took me 5 minutes!!
September 26, 2013 at 7:44 pm
Oh I’m so glad you liked it! So easy hey?!
April 3, 2014 at 11:06 am
I hope to do this, it looks great especially for us gals up here on the lake, very nautical!! Thanks Jeannie Drummond Island Mi!!